The Unoffical Hatchrite Incubator Technical Information Download Site


Hatchrite went out of business long ago, but the incubator machinery lives on!


By Kevin G. McCoy

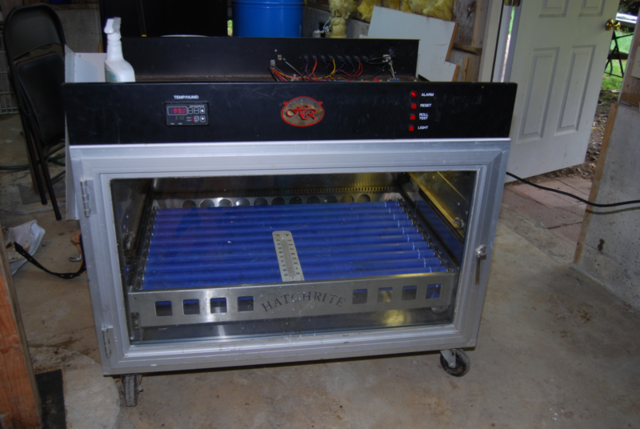
Hatchrite MP50Click the picture to see a some photos of the incubator hardware.

Index:


Welcome!

Hatchrite Incubators were originally designed to hatch Ratite eggs (Ostrich, Emu, Etc).  Sometimes you can pick up one of these machines for a song and convert it to hatching chickens, ducks and other species by simply changing the gap on the egg rollers to match your egg size. 

Since these are old units, and the company that made them has gone out of business, factory original parts are no longer available. You may have your work cut out for you if your unit is non-functional.  Most of the computer chips and mechanical parts are available from other sources, so all is not lost if your unit is not working.

When I bought mine, the electronics part was about 2/3rds fried, all the roller belts were broken, the humidifier was missing and the door switch didn't work.  I got mine fully functional for a few bucks worth of parts and a lot of personal time.  I am an electronic technician, an ex Ham Radio operator and a software design engineer - did I mention I also raise ducks - lots of them?  :-)

I won't fix your unit (but I know someone who will - see below), but I'd be happy to offer free advice if you get stuck during your repairs. 

These are complex units.  If you have an electrical problem and you are not comfortable with a soldering iron and some substantial electronic test equipment, you should try to find someone who is.  Also, it is possible (at greater expense) to replace most of the electronic guts of this thing with new, modern parts and bring it up to 21st century standards.  See the notes near the bottom of this page for some ideas.

Most of mechanical repairs on this unit are very straightforward.  If you can turn a screwdriver, you can fix just about any mechanical problem that may pop up.

I have hatched hundreds of duck, chicken and peafowl eggs in mine, so my story had a happy ending.  Hopefully you will too.

I am placing all the documentation I have collected to restore my unit to full functionality here on my web site for free download. Some of which I paid for, but I expect nothing in return.

Some guy who shall remain nameless (and lives in a "Sunny" place), tried to sell me some likely non-existent documentation for a ton of money.  Don't let this happen to you - get it here for free.

All I ask is that if you find any new technical information that is useful for any of the Hatchrite Incubator product line, please share it here.  If you'd like to share, drop me a line at hatchrite@idk-inc.com and I will do the rest.  If you fix these things commercially, I'd be happy to give you a plug here.  This site gets a lot of hits, so you might get some business out of it.

Hatchrite Units For Sale

Sorry, nothing at this time.


Hatchrite Repair Organizations

Here is a list of outfits that can repair your Hatchrite:

Trevor O'Meara (Note - Trevor's web site seems to have gone dark (5-2023), but I will leave the info here in case he repairs it)

cid:image001.jpg@01CAB392.3C4D0C80


Automated Products & Supplies

210 Willmott St. Unit # 5, Cobourg, Ontario, K9A 0E9
Phone:  (905) 372-5223
Fax:      (905) 372-5226

www.apscanada.com/manufacturer_links.htm

Check out Trevor's nice work, rewiring an older model Hatchrite:

Hatchrite and humidifier
Rewire #1
Rewire #2
Rewire #3

Check out Jay's pictures and rebuild notes below.

Here is his Email address:
Jay Winslow

Documentation

I have a CP-50, so initially, the documents will pertain to that unit.  The Hatchrite manual I have is pretty generic, so you may find it useful even if you have a different unit.  Here is a list of the files I have available for download.  Click the links to download a file

File/Directory
Size
Note
HatchriteManual.ZIP
30 MB
This is everything I have on the CP50, compressed into one big file.  If you download this, you do NOT need the rest of the files here.
Hatchrite Manual.doc
160 KB
CP50 Users manual (very basic) in Microsoft Word format
Illustrations from manual
Various
The original illustrations from the manual.  I have not had time to insert these into the DOC file above.
PID Settings.doc
47 KB
Watlow controller tuning/calibration procedure - very useful if you replace the humidifier or your unit cannot hold temp/humidity very well
Hatchrite Patent.pdf
500 KB
Original Hatchrite patent filing.  Some good technical drawings and overview, but not very helpful for troubleshooting.
Hatchrite MSDOS software
626 KB
Used to set up and monitor CP series incubators.  May work on other computer controllable Hatchrites.  Has massive Y2K problems and needs DOSBox.  Decompress with WinRAR.  This is the complete contents of the original factory floppy disk.  The only program you really need from the RAR is HATCHRIT.EXE.  It expects an RS-422 interface on COM2.  See my notes on this page for more details.
Watlow 988/989 Datasheet
100K
Basic information for the Watlow controller used on an CP50 incubator.  The HatchRite actually uses a Watlow model 999 controller - a slightly customized version of the 988/989 unit developed for the HatchRite company. The documentation here will work fine for the model 999.
Watlow 988/989 Manual
1.7 MB
Full technical manual for the Watlow controller used on an CP50 incubator
Watlow 988/989 Manual Addendum
18 KB
Some additional information about connecting external loads to the Watlow. Not very useful, but it is small :-)
Watlow 988/989 Communications
739 K
Information on the data communications protocols used to remotely control it.  Used by the CP50 control board to monitor/program the Watlow

So, I hope you find this information useful!  Please try to contribute additional information if you run across anything new that we can publish here.

I have a home made design for a replacement humidifier for the CP-50.  I am also writng some replacement software for the old DOS program used to program these things. Write me if you'd like more information (free). 

Things I have learned

Since the unit was designed for Ratite incubation which uses a lower temperature than Chicken/Duck eggs, the unit will go into alarm at or above 100F.  Since this is so close to the normal setpoint for Duck and Chicken eggs (99.9F), you will occasionally get overtemp alarms and heater shutdowns if the temperature overshoots just a hair.  It is safe to ignore this type of error.  My unit sometimes overshoots when the sun hits the side of the incubation room on a cold day. Once the controller self-adjusts, the overtemp alarms go away.  The internal high-temp cutoff switch in the Hatchrite will shut the heaters off at 100F.  Again, no big deal.  As soon as it drops below 100F, the heaters will start working again.

You can expect your Watlow controller to "hunt" around 99.9F, plus or minus 0.2F or so.  With a well calibrated PID, it should hang right at 99.9F most of the time.  Obviously, opening the door will cause the temperanture and humidity to drop, but mine comes back up in just a few minutes.  From a 60F "cold start" you can expect the unit to take about 30-45 minutes to come up to 99.9F and 60%. 

You may see the unit "hang" and fail to heat up upon initial turn on.  Insure the door is closed (and the door sensor switch is functional).  Give the unit an hour or so to purge any excess moisture from the chamber - it should eventually heat up and stabilize.  If not, break out the soldering iron :-)

Chicken and ducks and peafowl eggs are incubated at 99.9F.  You want to do a 180 degree rotation with each roll, so 14 seconds of roll time is about right for this size egg.  Eggs from other species that are significanly larger or smaller will need to have the time adjusted.  I have my unit set to roll the eggs every 6 hours, but you can set yours as you wish.  Roll time is non-critical, so don't overthink this :-)

I have my TV and some lights on the same power circuit as the Hatchrite.  I noticed the lights flickering bright and dim in my TV room as the Hatchrite was operating.  Since this was pretty anoying, I configured the Watlow controller to rapidly "stutter" the heater power instead of slowly turning them on and off.  The rapid pulsing of the heaters reduces the TV room light flickering to an almost unnoticable level.  The incubator temperature accuracy is not affected by eather fast or slow switching mode, so this is a purely cosmetic choice.  See the Watlow manual for instructions on how to change modes.  Look in the manual for BRST (burst) mode if you'd like to try it.

The old Hatchrite software will work on a modern computer, if you you use a utility called DOSBox. The software only works with Hatchrite models that have a built in computer interface.

Unfortunately, the Hatchrite software has massive Y2K issues.  I posted the vintage Hatchrite software here, but I gotta say, it is pretty bad, even by 1990's standards.  I know, because I was writing similar software in the 90's :-).  I am working on a replacement program that works in XP and Win7.  I'll post the new software here when I am ready to beta test it.  I have it reading my unit and saving T/H readings to a SQL database already.  I can graph T/H values in real time too. I am making progress.

Parts Resources

Part
Note
Roller belts - Fits mine, but you should measure yours first
Part number 3044K505, 3/16" x 10.75" urethane roller belts are found at www.McMaster.com for $5.38 a pop.  The replacement belts have been working in my unit for a couple years with no signs of wear or cracking.  There are measurement instructions on the McMaster web site - basically you tie a string around the rollers and then measure the string.  See my photos for how you thread them onto the rollers.  Make sure they all twist the same way!
Main Fan
Comair Rotron Tarzan TNE2A, 115 VAC 60Hz, 6 7/8" x 3 1/4" Frame Fan.  I got mine used on eBay ($45), but you can also find similar ones on
digikey.com If you want a new one from the factory, here is then try this link: factory part.  These things are surprisingly fragile. Do NOT drop one, or the motor and fan blades will crack off from the frame and fall out!  My old one shattered when I removed and accidentally dropped it a foot or two.  Mounted in the unit, they should last 10 years.  Any similar fan of the same voltage, size and CFM should work.
Internal electrical parts, computer chips and power management components for the motherboard
Digikey

The top of each chip is marked with a part number. 

Digikey carries just about all the chips and power control devices... except the CPU chip, which is mask-programmed.  This makes the CPU chip irreplaceable, since there is no way to program a blank CPU with the same firmware.  Most of the other chips, Triacs and Opto-Isolators, Triac drivers, Etc are a few cents a pop.  Digikey has no minimum order and ships very quickly.
RS-422 to USB interface
Used to connect a Hatchrite incubator to a computer so that you can monitor the temp/humidity, change settings, Etc. This is only available if your Hatchrite has the factory installed computer interface.  I got my RS-422 device at US Converters. The part number for mine is U-485G ($65 + shipping), but you can get a cheaper, non-isolated one for a lot less.

Set the converter up on COM2 if you want to use the old Hatchrite software.  You will need to run the Hatchrite software in "DOSBox" if you are using a modern Windows computer.  DOSBox is a free utility used by gamers interested in running vintage DOS games on modern PCs.

Hatchrite Computer Interface Protocol

My CP-50 uses RS-422 (NOT RS-232!) to communicate with a computer.  The port settings are 2400 Baud, 8-bit, No Parity, 1 Stop bit.  The Hatchrite is a responder-only device - you have to poll it or send it a command before it sends anything back to you. Multiple units can be daisy chained together on the RS-422 bus, but you have to give each unit a unique unit-code.  The unit code is set using the rotary switch found on the motherboard.  You can play with command codes and view responses by setting up HyperTerminal (built into Windows XP) to "talk" to you RS-422 converter.  Any other terminal program would work just as well.  Shut off software handshaking in your terminal program.  I am pretty sure you can turn on hardware handshaking, but since the baud rate is so slow, it is not really needed on a modern computer.

My Hatchrite has some serious firmware bugs, so it routinely "lies" about its internal status.  If you are writing software to interface with this unit, then you need to take this into account.

My unit goes into alarm every 30 seconds, and it is only after the alarm clears itself that the unit can respond with a valid temp/humidity reading.  All other readings are invalid.  The checksum is always correct, so there is no way short of tossing obviously bad readings to separate the chaff from the wheat.

I put tape over the Sonalert "beeper" on the motherboard so that you can only hear the beep if you are standing right next to the unit. Even though my unit is alarming every 30 seconds, it works fine.  Otherwise I would troubleshoot further or make my own controller.

Here is a breakdown of the various command/response strings.  crlf= carriage return, line feed.  In hex this is 0x0D 0x0A.  This is two ASCII characters, not the whole hex string.  The protocol documentation below assumes a single Hatchrite is attached, with its Unit Code set to "1".  I have not tried setting it to some other unit code, but it should be easy to reverse engineer the mult-unit protocol with HyperTerminal.  I am pretty sure each unit code uses up 2 "addresses" in the protocol - one for the room sensor and another for the chamber sensors.

Command
HatchRite Responds
Note
<R00>crlf
<U00:Tttt:Hhhh:An:xx>crlf
Room #1 Temp/Humidity, Where ttt=Temp F * 10, hhh= Humidity % * 10, n=Alarm Flags, xx=checksum
I think the checksum is a (really lame) sum of all the bytes. ttt=3 numeric ASCII characters, hhh=3 numerics, Etc.  T899 = 89.9F.

I do not have a room sensor module connected to the room input, since one did not come with my unit.  Reading a non-existent room sensor results in random T/H readings. 
<R01>crlf
<U01:Tttt:Hhhh:An:xx>crlf
Incubator #1 Temp/Humidity;  Same protocol as above. 

Example:

<U01:T999:H650:A0:17>crlf 

= 99.9F, 65% humidity, no alarms.  Alarm flags do not appear to function properly in my unit. I don't bother with verifying the checksum in my software.

Lies:

My unit can only give a valid reading every 30 seconds. If you query the unit when it is not ready, you will get one or more of the following results:

T555 = invalid temp reading - skip it
T000 = 100F - does not fit the T * 10 algorithm, but you can trap this in your code and translate it to 100.0F
H001 = invalid reading - skip it

<S01:Taaa:bbb:ccc:Hddd:eee:fff:Ngg:Fhh:Diii:jj:kk>crlf
<ACK>crlf
Set incubator #1 to
    aaa degrees F setpoint, where 789=78.9F
    bbb degrees F high-alarm point, where 678 = 67.8F
    ccc degrees F low-alarm point
    ddd percent humidity setpoint where 650 = 65.0%
    eee percent humidity high alarm
    fff percent humidity low alarm
   gg hours on, internal light (not implemented on my CP-50)
   hh hours off, internal light (not implemented on my CP-50)
   iii hours between egg rolls where 123 = 12.3 hours
   jj seconds of egg roll time
  kk checksum

Example:

<S01:T999:999:960:H650:750:550:N10:F10:D060:14:90>crlf

Sets the unit to 99.9F, 65% Humidity, with temperature alarm points 99.9F (high) and 96.0F low; Humidity alarms set to 75% high and 55% low.  Roll eggs for 14 seconds, every 6 hours.


Egg Rollers and Belts

This kind of reiterates some other information on this site.  I get a lot of questions about belts and rollers, so I am adding a section to kind of centralize it so you don't have to read this whole mess.

My web site lists part numbers for belts and other parts that wear out here:

Belt Part Numbers

If you are missing other parts then you will have to make them or cannibalize another Hatchrite unit.  The Hatchrite company went out of business years ago, so buying parts from them is not an option.  Luckily, most to the parts that are likely to wear out are available from places like Grainger Industrial Supply, eBay and Amazon.

Sorry but roller installation is going to be a headache - there are dozens of hex nuts that attach them to the drawers.  If I recall correctly, the roller brackets are held on with hexagonal nuts.  You can get the nuts at Home Depot or Lowes.  Buy them by the box - they are cheaper than the little plastic bags of hex nuts.  

There are way too many nuts (40-80 of them I think) to hand-tighten with a wrench.  Therefore, I recommend using a nut driver socket attached to a power drill.  Use a very low torque setting or you will strip the threads on the mounting hardware.  You will probably need to loosen and re-tighten them a few times until you get the spacing just right.  Be careful: There are sharp edges on the drawers that can slice you up.

Make sure that the rollers are mounted "square" with the drawer and they are perfectly parallel.  Otherwise your eggs will "walk" to one end of the rollers or the other while you are incubating them.  It is not good to let the eggs rub together as they roll.

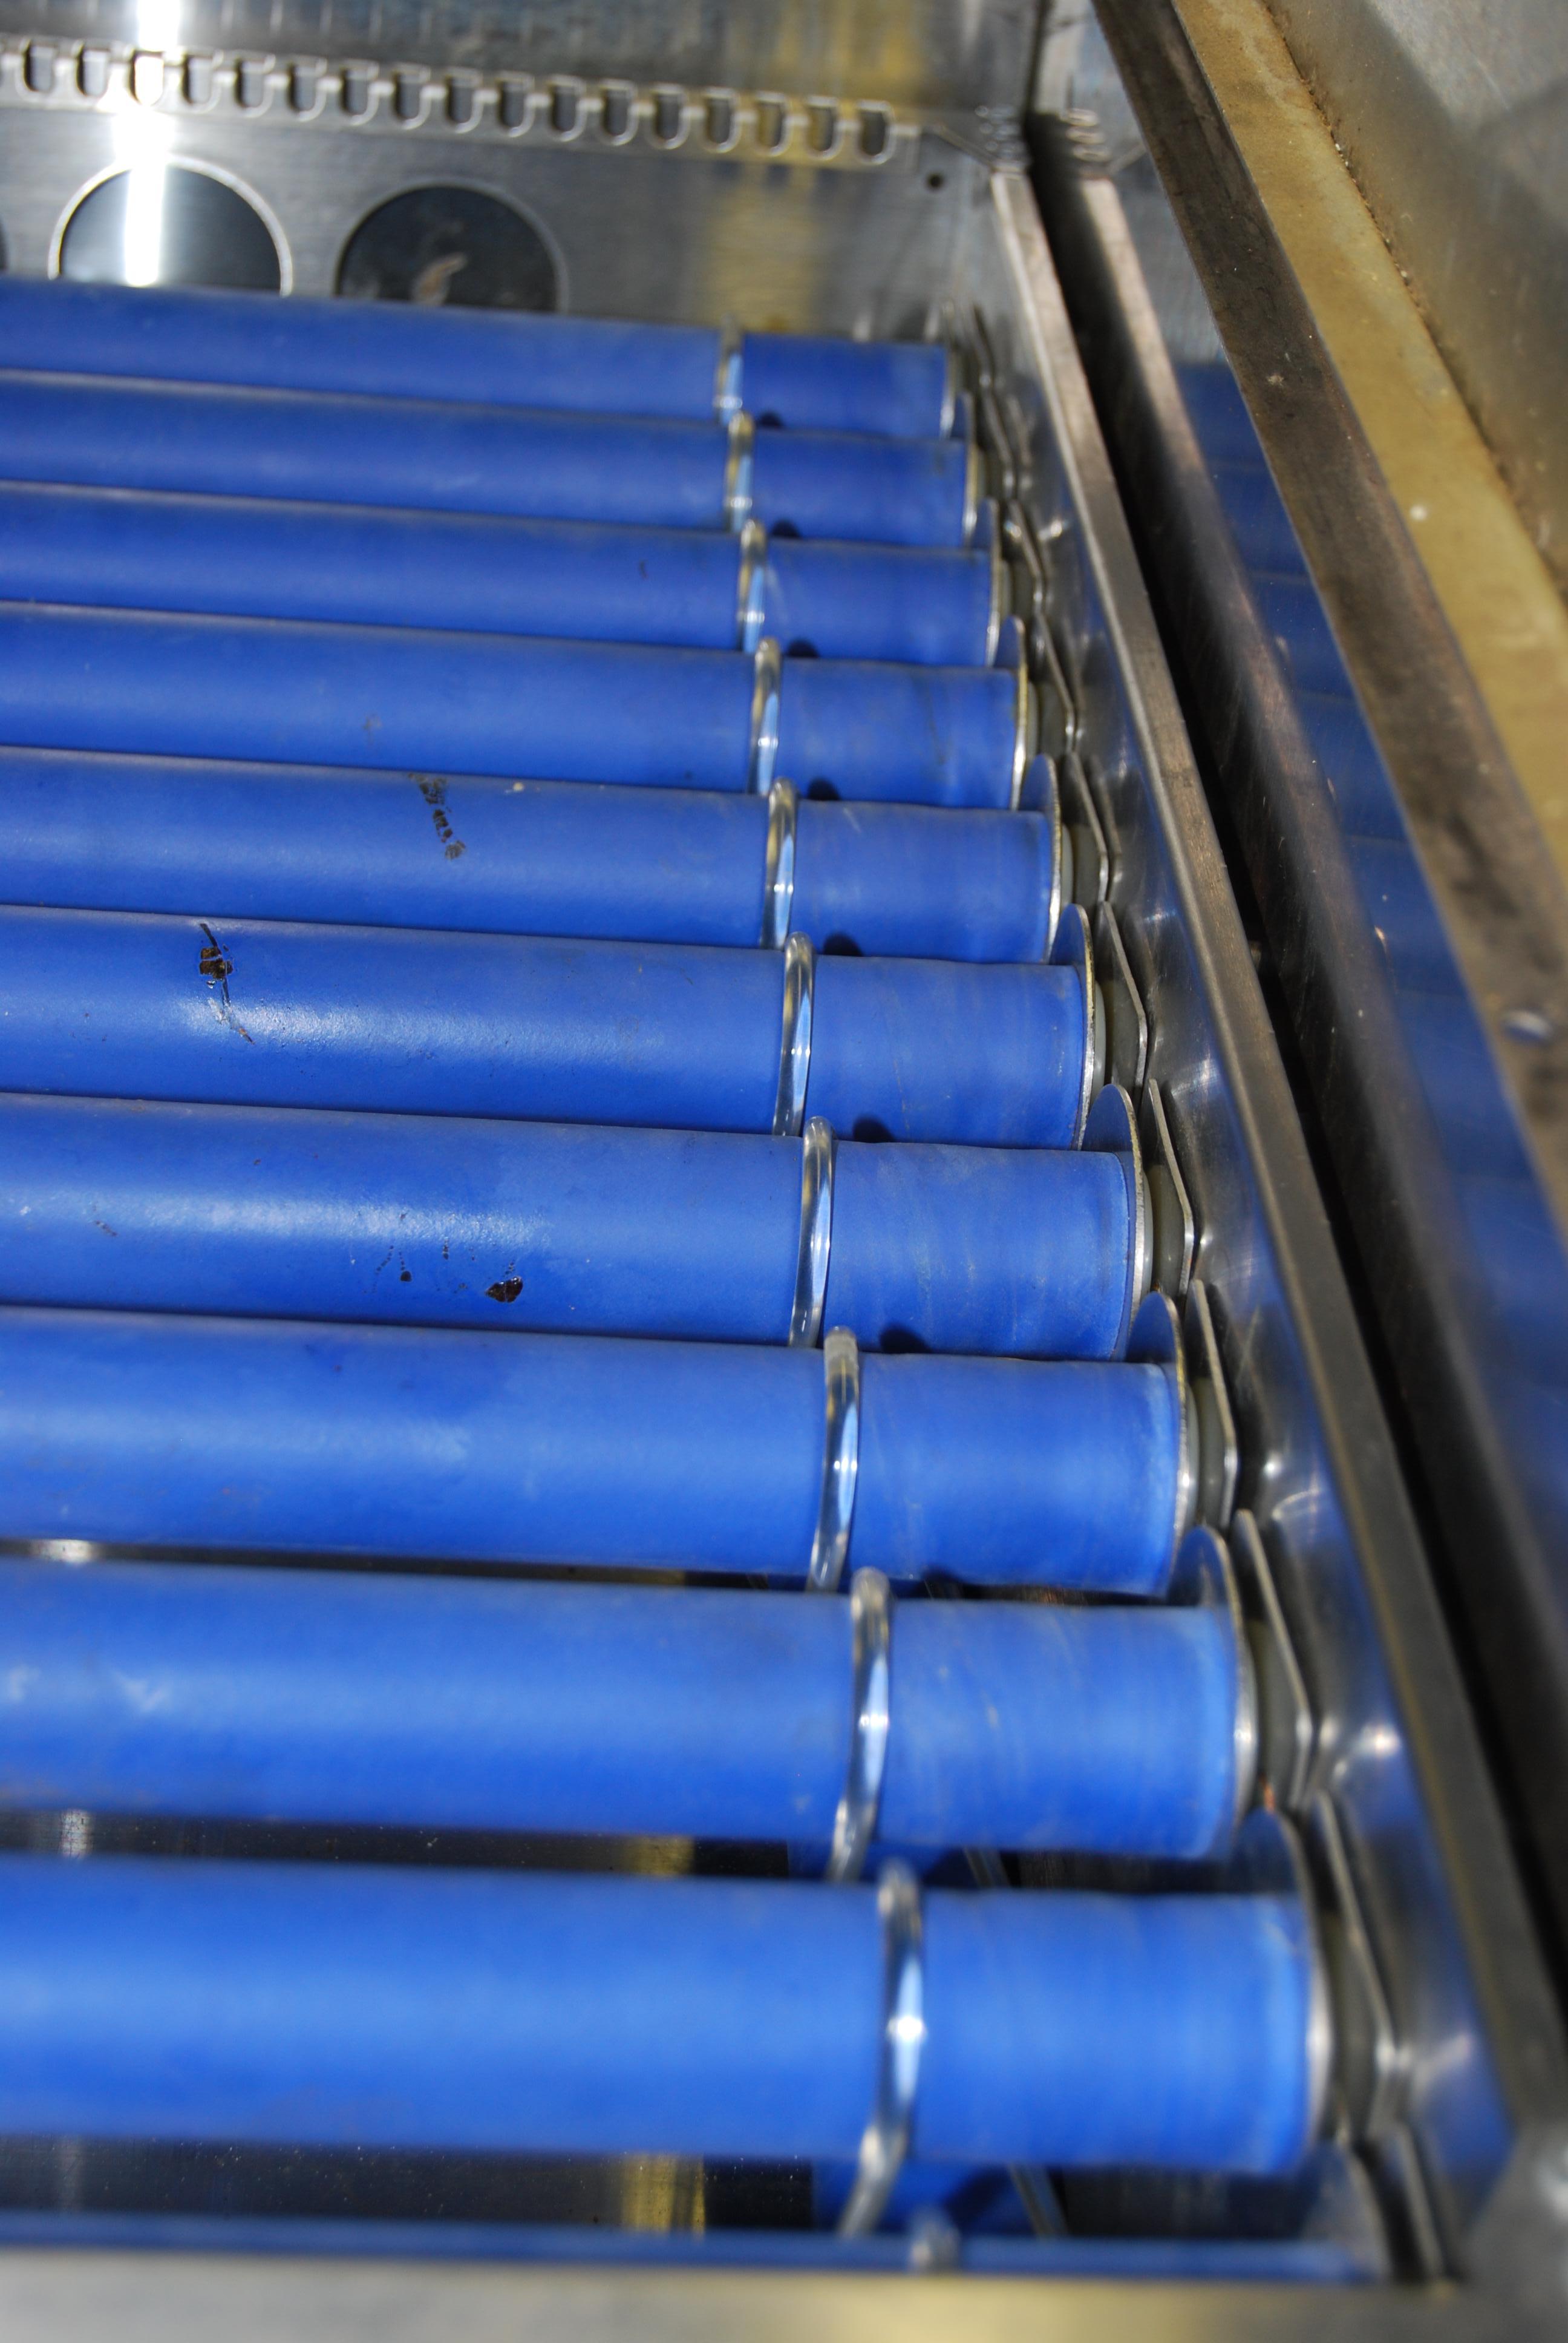
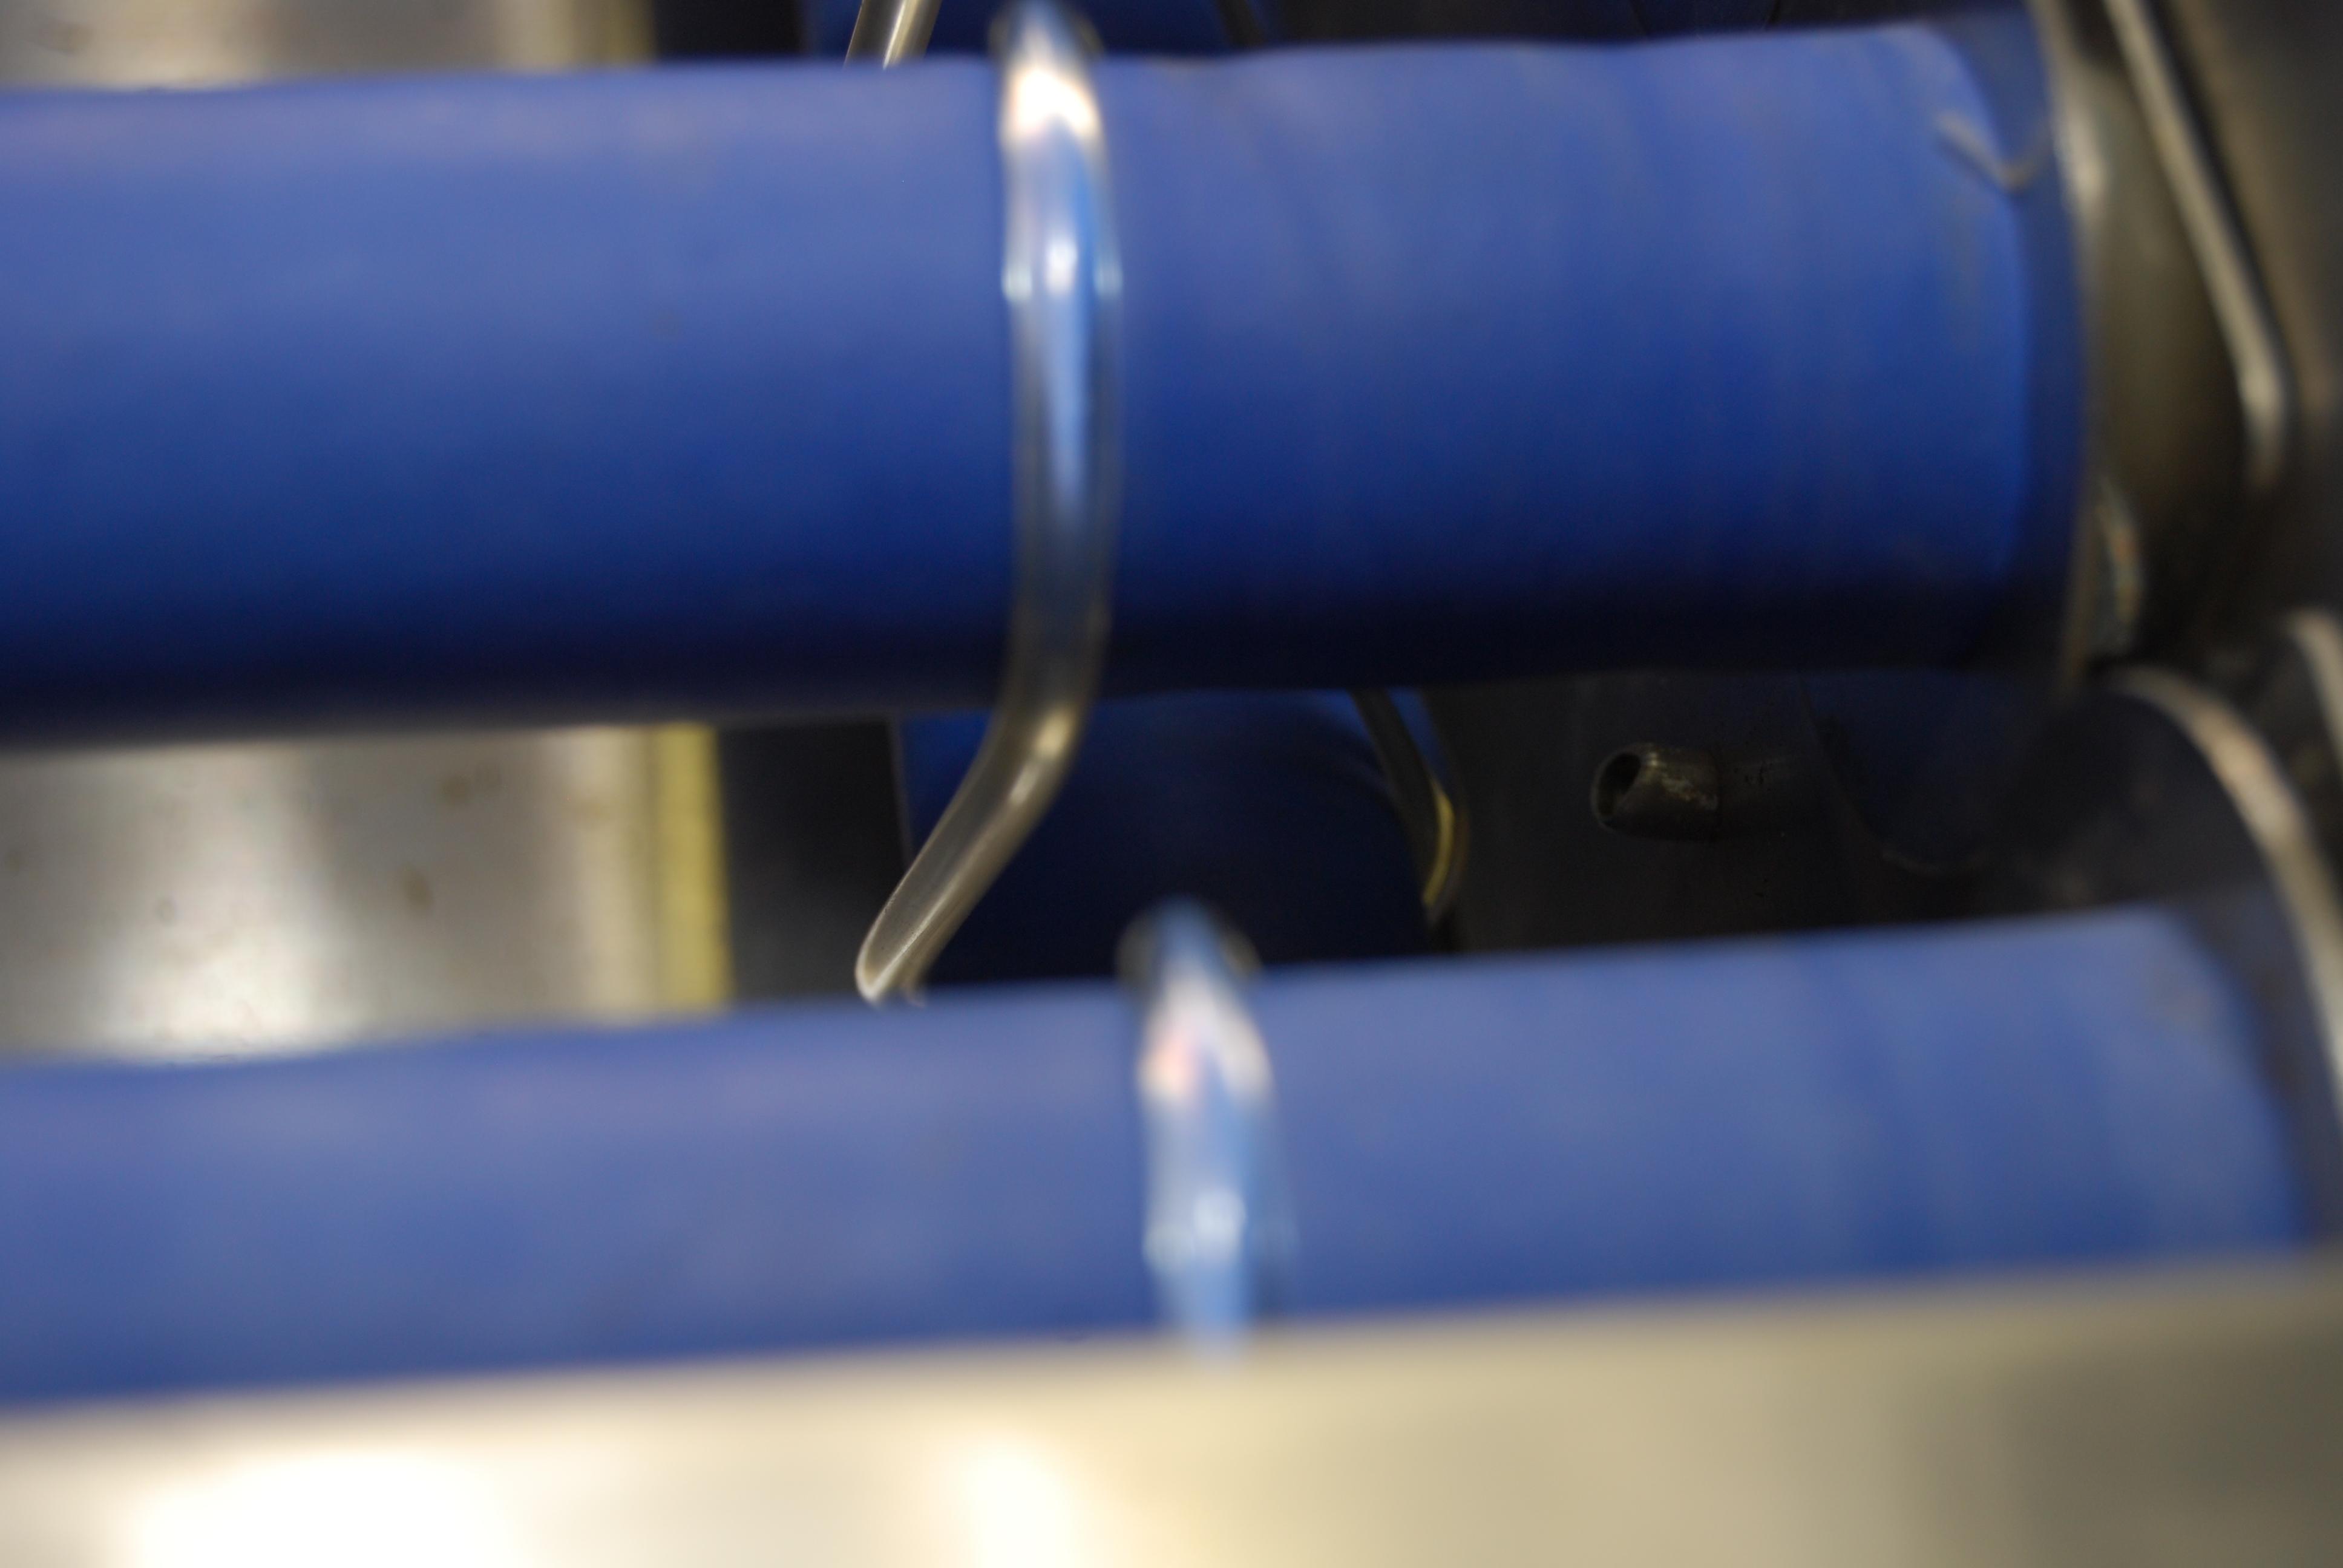
You need to space the rollers for the type of eggs you are going to hatch.  You space them as you attach the roller brackets and rollers to the drawers.  The brackets are actually the bearings for the rollers.  The belts are attached as you install each roller.  One special roller is the "drive" roller that runs perpendicular to the egg rollers.  You can barely see it in the photos - it runs underneath the egg rollers.  Each egg roller will have a rubber belt that connects it to the drive "roller".  Each belt needs to be installed with a quarter-twist (like an open figure-8).  The twist direction does not matter, but all the belts must be twisted in the same direction (clockwise/counterclockwise).  The drive roller has a "T" shaped end to it that fits into the drive motor socket.  The motor turns the drive roller and the belts that are wrapped around the drive roller transmits the rotation to each of the egg rollers.  The drive roller looks similar to the egg rollers, but it is slightly longer or shorter (I don't recall) than the egg rollers.  Don't lose the drive roller - they are very hard to come by.

You probably want to install the drive roller last.  Just let the belts hang down from the egg rollers until the spacing is adjusted properly.  Then thread the drive roller through all of the belts, giving each belt a quarter-twist in the same direction.  I am working from memories from 10-12 years ago, so you may have to experiment if I am wrong. :-[

Bottom Line:  You should be able to turn the drive roller by hand and all the egg rollers should spin in the same direction.  If not, you have a belt that was twisted wrong.

Here are some photos of belts and rollers on a functional Hatchrite:


Notice the quarter-twist in the belt between the egg roller and the drive roller found underneath:


Replacement egg rollers and brackets are going to be hard to come by.  The brackets could be made out of aluminum sheet metal and a plastic tube the size of the roller shaft bearing.  The rollers themselves are going to be anywhere from difficult to impossible to find, unless you buy another Hatchrite and tear it down for parts.  If you have brackets for only one factory-stock drawer then you may not be able to fully populate it with enough rollers for smaller eggs.

If I had to make new rollers, I'd buy aluminum tubing and cover it with neoprene - something like SCUBA diving suit material.  The end caps and spindles would have to be made on a lathe.  Doable, but tedious

Brackets should be relatively easy to make, or have made by someone with sheet metal skills.  It might be possible to make s strip of aluminum sheet metal with holes drilled for the roller shafts at the proper spacing.  That could replace all the bazillion brackets, nuts and screws.  The roller shafts could fit directly into the holes.  It wouldn't be adjustable, but it would be very  "cheap and dirty".  You would need two strips - one for each side of the drawer. You can buy aluminum sheet metal from OnlineMetals.com.  You can cut aluminum sheet metal on a table saw with a fine tooth blade normally used for plywood and veneer.  Wear eye protection!  The hot metal chips flying out of the saw are brutal!

Updates


A minor disaster has happened (Mar 2013).  My temperature sensor has died, so my Hatchrite can no longer hold a stable temperature.  I got on eBay and found that there are lots of replacement sensors you can use.  You need a 4-20 mA Temperature / Humidity sensor to replace the obsolete one that shipped with the stock incubator.  I settled on the Omega HX93C, as you can find them in the $40-$60 USD range.  Unfortunately, the one I bought on eBay drifts too much and turned out to be unusable.  The seller seems like a stand-up guy and has offered my money back.  I put in a bid on another, similar unit and will see how that one works out.

If you replace the sensor, you need to change some settings in the Watlow Controller to calibrate it to the min-max range of the sensor.  The information on setting the high/low temp range is found in the Watlow documentation found above.  Example:  the HX93C has a temperature range of -4F to 167F.  It outputs 4 miliamps at -4F and 20 miliamps at 167F.  You need to enter the -4 and 167 values into the Watlow so that it reads correctly.  The old sensor had a different temperature span - if you fail to change the Watlow settings to match the sensor, the incubation temperature will be way off.

Hmm.  What timing... As I was typing this in, my eBay bid on a second HX93C just won!  I got this one for $40 USD too.  The link I listed shows much higher prices, but they sell cleaner, newer ones, typically surplus.  New, I think these things originally sold for over $300 USD!

Other stuff:  I am designing a new humidifier unit.  The ultrasonic fog generator in my modified Crane humidifier is getting old and I can't find a replacement ceramic transducer disk (the part that vibrates and makes fog).  After a couple years of use, the Crane unit puts out about half the fog that it used to, so it is pretty much on full-blast to get 70% RH inside the HatchRite.  I have decided to make my own unit, using decorative-pond fog-generators.  You are supposed to drop one of these into your Koi pond or fountain, turn it on and get Sci-Fi movie fog billowing out.  Some of these also have colored LED lights on top that change colors and light up the fog - very festive, I am sure.  You can get these from eBay for about $6.00 USD each, if you shop around.  I want to go this route, so that it will be easy to replace the fog generator in the future (they wear out in a year or two anyway).  You can also get replacement ceramic disk transducers at your local aquarium shop - people use these fog generators in their herpetariums, I am told.  Even used, the Crane runs $40-60 USD on eBay so the cheaper generator is very attractive.  My plan is to make a water-tight plexiglass box to hold the fog generator, add a cheapie Chinese-made float valve, and a couple power supplies.  One supply is controlled by the HatchRite to turn the fog generator on and off; The second one will power my existing water pump that will keep the fog generator submerged under a controled water level.  The fload valve will turn the pump on when the water level gets low.  Right now I steal power from the Crane unit to run my little water pump.  I use a 20 gallon tank to hold about 30 days of humidifer water.


I got an interesting letter from a Mr Jay Winslow, who has developed some cool tricks for completely replacing the electronics of a HartchRite CP model (and MP as well, I think).  He rips out all the old HatchRite circuit boards and replaces them with modern equivalents.  His solution is a bit more pricey than mine, but his end result will probably be more reliable than patching up the stock parts like I did.  Well, that plus you don't need a couple kilobucks worth of test equipment and computer chips ;-)

Here are some pictures of the fine work he is doing, completely refurbishing HatchRite incubators.

If you'd like to get a quote from him to rebuild your HatchRite, then click here to Email him.

Here is his letter to me.  I have inserted links to the products he mentioned; Comments in red are mine:

The older models that have the ATC roll timers on the front , we left the computer board in. Those do not have the heater, humidifier and roll relays built on the boards, which give all the problems.

The newer models with the roll timer software built in the Watlow controllers, I took those boards out. To replace I used a cheap 15 volt dc power supply and 25 amp Normally open, zero switching,  solid state relays for the heater and humidifier circuits. For the high heat limit I used a 25 amp normally closed, zero switching solid state relay and loop the hot leg in series with the normally open relay for the heat. It must be first in line to the incoming power.  Editors note: Search eBay for "solid state relay zero crossing".  Expect to pay about $5-$20 USD

On the dc signal side of the relays, your controllers produce a dc signal to call for heat or humidifier. You just hook those up straight to the relays from the controllers. Make sure polarity is correct. Do not tie the power supply to the signal side of the relay!

For the low water switch on the humidifiers I used a simple low amp relay( cheap) that is normally closed. The float valve in the humidifier are closed when there is water present.  So wire the relay so that is opens the circuit if the humidifier runs out of water. You get your power from the dc power supply.

For roll timers I used a ATC model 422ar. They are panel mount. I installed a normally closed 8 amp push button on the panel for the roll test. The incubators have terminal strips already in place to tie your hot, neutral and ground to find power easily.  I then used a bistable relay which flips for clockwise and counterclockwise. Its model number is s90r11abd-120 from TE Connectivity. The wiring is self explanatory with the instruction from the timer.

For alarms I used a simple dc powered buzzer and connects directly to the Watlow controllers relay contacts. The Watlows have a relay built in for each channel for the alarm circuit. (check your controller model number to verify)

For the temp and humid transmitter in the incubator, which sends a signal to the controller in 4-20ma dc (for all the Hatchrites I have rebuilt). I used a water proof transmitter from Omega.com Model HX303AC. These are not cheap but you have to have it for good control. They are $285. They are the cheapest quality transmitter I can find.  What I have found on the transmitters that Hatchrite used is they get wet and shorts out the humidifier signal side. Especially the bottom unit on a stack unit. The cabinet sweats between the outside and inside panels.

Light circuits just hook up through the switch that is on the panel anyway. I dont know why they hooked  those up to a relay on the board.  Editors note:  The lights were turned on/off by a timer on the main logic board on some early units, presumably so that newly hatched chicks could read books and visit with their friends while waiting to be rescued from the HatchRite.

I installed a device on my incubators that is called a iServer model ithx-sd that send me a text to my cell phone if it goes into alarm.

This is not the cheapest way to go, but you still have the precise control for the incubator that will last a long time.

If you want model numbers for all the parts send me a email back and I will compile a list.

My motto is the KISS method. Which means keep it simple stupid.

                                                                                                               Jay


Update 14 May 2013

I have completed yet another rebuild of my HatchRite CP50, this time removing most of the wiring and the motherboard.  I have replaced all the motherboard functionality with modern Solid State Relays (SSR), a roller timer and a flip-flop relay to alternate the roller direction.  I used the parts mentioned by Jay, but probably wired them a tiny bit differently - and a bit less neat :-)  I used a (much) cheaper sensor for temp/humidity, but the one he selected is probably a better choice.

I tried to use the old overtemp switch that came with the HatchRite.  It turns out that it wants to shut the unit down when it reaches 99.0 F (Ratite hatching temperature).  This is no good, as you hatch chicken and duck eggs at 99.9-100.0 F.  Although I designed an overtemp cutoff circuit, I was not able to complete it using the old switch.  I will work out something different later.  I will probably use a miniature digital temperature controller and an RTD sensor for best accuracy.  I can salvage the RTD from the old HatchRite temp/humidity sensor that died.

I made 3 videos of the rebuild.  They are all in hi-res. If you have enough Internet bandwidth, you can watch them in full-screen HDTV - and see my messy basement in all of its glory.

Here is a video showing the unit with the initial wiring harness and my new and improved humidity generator:


Here is a second video showing the finailized wiring harness and initial unit test.  No smoke and no electrons were harmed in the filming of this documenatary!:


Here is the 3rd and final video that shows the humdifier water tank details, water pump and a batch of eggs incubating.  It also shows the rear details of the CP50.  If the video quits near the end of the move, just go watch it on Youtube. It works OK there.


I made a hand drawn schematic for my modifications.  I will post it as soon as I have a chance to clean it up and scan it in.  I might be able to manage a wiring list, but that might take a bit more work.  I changed the physical wiring harness a couple times after designing the wiring list, so it is not very accurate.

Update 21 April 2014

 My ultrasonic fog generatore (humidifier) finally gave up the ghost.  Luckily, the little blue humidifier box (as seen in the videos found above) I made is really easy to work on and I had a spare ultrasonic fogger in my parts bin.  I added an inline connector to the power cable running to the fogger so that it will be even easier to replace next time.  I have about 120 chicken, duck and turkey eggs in my Hatchrite right now.

Update 23 April 2014

I just got an Email from Trevor, who works at a repair outfit in Coubourg, Ontario, Canada. I created a listing of Hatchrite repair organizations and added him.

I also heard from a Hatchrite user that had their stock humidifier overflow into the circuit board and short it out.  Don't put your humidifier on top of the Hatchrite!  You can put it on the floor or maybe on top of the fan housing.  It can't do much damage in either place if it leaks or overflows.

Update 2 June 2014
I added some photos of a rebuild by Trevor O'Meara of an older Hatchrite using separate controllers for Temp / Humidity.  What a nice wiring job!  It looks way better than mine - I am jealous!  Also, this is the first time I have seen an actual Hatchrite humidifier!

Update 22 October 2014
Well, the two cheap plastic Chinese ultrasonic foggers I used died in quick succession.  It's a good thing they were cheap, since you can't replace the ceramic disk (the part that vibrates to make fog).  I bought a new, tripple-disk fog generator, but it was too big for my little blue box that holds the water for humidity generation (see video).   So...  I bought a small Pelican case, like you would store a camera or pistol in - really first rate quality, water tight, and large enough for the new (huge) fogger.  The new case holds quite a lot of water.  I installed a float switch and barbed fittings for the intake and exhaust port hoses going to the Hatchrite. It looks pretty much like the videos above, only about 4-5 times the size.  The new case is black, so you can't see inside.  Also the new fog generator has no flashing disco-lights, which is kind of sad.  It was fun watching the light show with the old one when the Hatchrite was running.

The new fog generator has replaceable disks, so I bought a couple packs of replacement ones, plus the tool to remove and replace them.  I am all ready for spring!

So far, the new humidity generator puts out enough water vapor to run at well over 70% RH, even with the Hatchrite vent wide open.  This is great, since I had to tape over most of the vent to get up to maybe 60% RH (too low for good hatch rates!) with the previous generator.  My tests went well so now it is time to clean the Hatchrite and winterize it.  I am draining the big water tank tonight and will empty the fog generator tank tomorrow.  I will update this page in the spring when it is hatching season again.

Update 24 April 2015
I finally got around to scanning in the hand-drawn wiring diagram I used for an early version of my Hatchrite rebuild.  Please note that I have made a lot of changes since this diagram was created.  Why?  Because when I swap out parts, I need to make changes in the wiring to support the new hardware.  You will too!  Use the schematics as a guide/starting point, not a final design!  You will need to make modifications!  Use at your own risk!

I had to make big changes to the wiring to:
I had to remove the old overtemp switch (the mercury thermometer looking thing stuffed into the old T/H sensor.  It is set for 99F which is too low for chicken/duck egg incubation.  It made the temperature "hunt" around 97-100F constantly.  I removed the SSR that cut off the heaters when an overtemp condition is detected. I also removed the circutiry that drives the old overtemp SSR.

I replaced the small ultrasonic fogger with a much larger one.  The old one was powered by DC.  The new one uses 24V AC.  I had to replace the DC SSR that controlled the old fogger and installed a new AC SSR to turn the big fogger's power transformer on and off.  I also had to install a household AC outlet so that I could plug in the new fogger's transformer.

The cheap Chinese float switch I used to set the water level in the humidifier box died in the worst possible way.  It got stuck in the "on" position and pumped about 25 gallons of water into the box and on to the floor.  Luckily, my basement is set up to accept a small amount of flooding.  I made some modifications to the float switch circuitry and eventually replaced the float switch.

There are two schematics.  One is the master schematic that shows my early design.  Some of the abbreviations include:

Terminal Boards (actually Terminal Strips) are the black strips with lots of screws for crimp terminal wire ends.  There are several factory mounted ones in the HatchRite.  One is for AC Neutral, one for AC Hot, and one for AC Ground.  White wires are usually AC Neutral, Black is usually AC Hot (Black=Death if you touch it), and Green is usually AC Ground.  There are exceptions to the color code.

So...

TBNx = Terminal Board Neutral, where X= the screw number
TBHx = Terminal Board Hot, where X=screw number
TBGx = Terminal Board Ground, where X=screw number

PSU= Power Supply Unit.  You have to buy/add these
RY1 = is a special flip-flop relay. 
Fuse (circuit breakers actually) were repurposed from the old stock unit.  I used the fuse name to identify the one I used.

SSR = Solid State Relay.  They are made in both AC and DC versions.  Make sure you use the correct type, if you make modifications to my design.

All resistors are 1/2 watt, but 1/4 W would probably work just fine.

The Molex connector is found under the roller motor housing at the rear of the unit.

I made a second schematic of the Watlow controller.  This diagram is a bit superfluous, as it already appears on the main schematic.  It does show a much simplified layout which may be easier to follow.

Note that the wiring may differ from yours if you don't have the same model Watlow as I do!  You may have to trace wires from YOUR Watlow to find out what each one does!

Take a look at the schematics here.  I also included closeups of my new high-output humidifier.  This one works much better than the old one. 

Click on the pictures to zoom in.  You should be able to print the large ones on your printer from inside your browser.  You can also download the images and print them from your favorite photo editor.

Update 5 May, 2015:
I added some closeups of wire routing and how to attach wires to the sheet metal with sticky pads and tiewraps.  Home Depot sells both peel-and-stick sticky pads and tiewraps.

Update 29 May 2015:
Here is a link to an older version of my wiring list.  It is probably close to the layout found in the schematic listed above.  It shows the colors and wire gauges I used (AWG, an abbreviation for American Wire Gauge) for each wire and where the ends of each wire goes.  This file is in Microsoft Excel format, so you will need to have access to MS Office to open/print it.  Use at your own risk!  There are probably errors in the list.  Errors in my list or in how you implement it could cause (and not limited to) equipment damage, fire, injury or death.

You should not attempt to use this list unless you are well versed in electronic hardware and high voltage safety.  Check everything before applying power to your new harness:  Insure there are no exposed wire conductors, torn insulation, Etc. Insure there are no shorts, miswires and other mistakes that could cause fire or injury.  It is not enough to follow the wiring list.  You must use an Ohm meter and be able to interpret the readings yourself to determine if the wiring is safe or not.

Note that most of the exposed terminals in the Hatchrite are "hot" with 120 Volt electricity.  Some are "hot" even if the unit power switch is turned off.  Unplug the unit for maximum safety when the top cover has been removed.

If you do find errors in my wiring list, then write me and I will update it.

By the way, I bought all the wire I used in my latest rebuild from DigiKey.  They have a wide selection of colors and gauges.  Try to color code everything - it makes retracing wires a lot easer and wiring errors harder! 

Wire is not cheap! It costs about $10 USD per 50 foot roll (about $0.20 / Foot).  If you can't locate a specific wire guage, then you can safely buy the next LOWER AWG size.  AWG numbers are backwards: 24 AWG is smaller than 14 AWG.
Don't go the other direction unless you know how many Amps the wire will be handling and know the rules about wire guages versus current.  You don't want to overload your wire with too much current (Amps) and cause a fire. 

You can use cheap PVC insulated wire.  The original wire harness used that type of insulation and it will work fine.

Update February 2016:
I just moved from Olympia Washington to a few miles from Disney World in Florida! A new job brings me from rainy Washington to Sunny Florida. I drove the entire way...  Twice.  This is an endevor everyone should try... Once.  And preferably without the company of two large ranch dogs that completely lack any sort of manners.

Sadly, I am selling my Washington ranch and have already sold my HatchRite.  I will keep this site up and running at its new URL since there is a lot of good information here and the site gets a lot of traffic.  I probably won't be doing any more updates, since I no longer have the HatchRite hardware. I will be happy to answer questions and make comments on your repairs and rebuilds.

Update July 2022:
I added a for-sale advert and pictures of the two types of stock Hatchrite "boilers" the units that make humidity for the hatching chambers.

Update May 2023:
I added SSL security (https) to this site and fixed a number of broken links to parts manufacturers
Have fun and stay safe!

Best regards,

Kevin G. McCoy

Last update: 27 July 2022